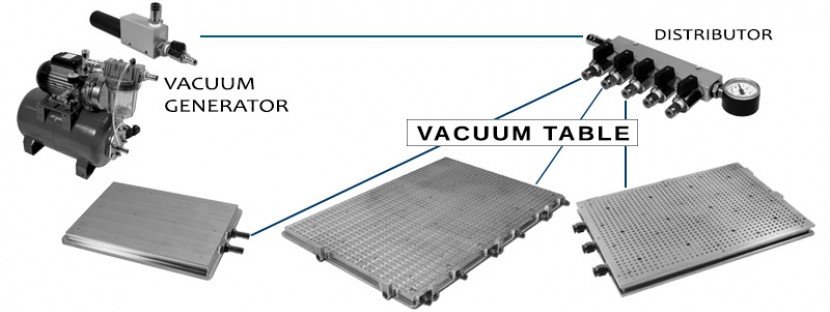
How to setup your vacuum table
06 Nov


Although it may vary depending on your setup these instructions can provide a rough guide to get you up and running in no time.
Should you have a specific question not answered here, contact us or talk to us on live chat.
The R Series
- Fix the vacuum table to your t-slot or adapter plate using clamps to attach to the lip around the table.
- Add and connect the supplied hose from the table to your vacuum.
- Remove the grub screws from the table surface.
- Place rubber cord that will go around your workpiece to form a good seal.
- Optionally use the PVC mat, if break-through milling, whereby it will act to protect the table surface.
- Put your workpiece on the table and turn on your vacuum.
The RAL Series
- Fix the vacuum table to your t-slot using clamps on your host machine and attach to the lip around the table.
- Add the hose connection from the vacuum table to the manifold.
- Using the hose supplied connect the manifold to the Venturi.
- Then connect the Venturi to your compressor.
- Remove one or more (depending on the size of your workpiece) of the grub screws from the table surface.
- Use the rubber cord to create a seal around your part.
- Place your part on top.
- Turn on your compressor and open the manifold and Venturi valves.
The RAL Pro Series
- Fix the vacuum table to your t-slot using clamps on your host machine and attach to the lip around the table.
- Due to the RAL Pro featuring an integrated Venturi and manifold simply connect the Venturi to your vacuum generator.
- Remove one or more (depending on the size of your workpiece) of the grub screws from the table surface.
- Use the rubber cord to create a seal around your part.
- Place your part on top.
The SEAL & ST Series
- The ST Series is fixed to your t-slot plate with screws using holes located around the perimeter of the table.
- The SEAL Series comes with an adaptor plate. Screw this into your t-slot plate then place the table inside and use screws around the perimeter.
- Insert the supplied hose into the vacuum table holes located at the side.
- If using a vacuum cleaner, attach the adapter to it and your hose connections from your vacuum table.
- Place the supplied hole rubber mat onto the table surface ensuring to cover as much as possible.
- Place your workpiece on the table and turn on your vacuum.
It is important, especially for small workpieces, to ensure there is minimal leakage around your part.
You can do this by sealing all areas around your workpiece using adhesive tape or stretch foil.
The video below shows how this can be achieved.
